Videoconferencing Tips
Nov 25, 2013 2:42 PM,
By Don Kreski
THE PHYSICAL ENVIRONMENT
· Eliminate clutter. The most common problem in corporate and home office video setups, according to Bob Mathes, director of AV Sales and marketing at Draper, is clutter. Not only is it unprofessional, but shiny objects can throw off a camera’s iris, darkening the faces of people in the shot.
· Eliminate movement. The compression algorithms used in HD videoconferencing systems work by capturing repetitive information and transmitting it just once. If the background shot includes, for example, a clock with a moving pendulum or a doorway opening into a busy work area, the system will have to capture, compress, and transmit that changing background for every frame.
· Choose neutral colors. Background color can affect how people in a videoconference perceive each other and, in extreme cases, throw off the camera’s white balance. System manufacturers and most design consultants recommend a light to medium gray, beige, or brown.
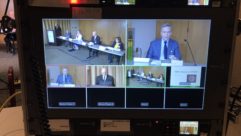
· Identify participants. In a multi-point call, it can be confusing to figure out who is who and where they are located. “You know the people in your own office, but it can be tough to keep track of staff on the East Coast,” says Amy Madden, product manager for Draper Video Conferencing Solutions, who has been working with Draper engineers on ways to improve the performance of videoconferencing rooms. “Now imagine your customer’s confusion when you tie two or three other offices into a multi-point consultation.”
In a perfect world, she suggests, organizations would dedicate a room strictly to videoconferencing and carefully control any factor that might affect the video. Most, however, must use their conference rooms, classrooms, and offices for multiple purposes. In this case, try to use neutral colors, avoid artwork visible to the camera, close doors, keep signs on tables or desktops with the company name and city, and always keep the rooms scrupulously clean.
The simple alternative is to place a neutral-toned fabric background behind the people in the conference, blocking clutter, movement, and other potential distractions—and by doing so, create a dedicated video environment on a temporary basis. A printed background with the company logo and office location can solve the identity problem, as well. “We thought the ideal would be a solid or printed background delivered by a motorized mechanism,” Mathes says. “Not finding that on the market, we set out to develop one.”
LIGHTING AND WINDOWS
· Use bright, soft lighting that evenly illuminates faces. Standard fluorescent fixtures mounted directly overhead can produce shadows in the eye sockets and below the nose and chin. Meeting participants with prominent features will not look good, and it may be difficult to see their eyes and read their expressions. Fortunately, there are several options on the market that can help. Some lighting designers add wall-mounted fixtures to fill in the shadows on faces. Brightline and Lutron offer specialized fluorescent fixtures that create an effect similar to studio lights. Brightline offers portable video lights suitable for a home office, as well.
· Eliminate color conflicts due to mixed lighting. To get good video pickup, it’s crucial that all of the lights in the room are of the same color temperature. Mixing fluorescent and LED or incandescent fixtures can throw off the camera’s white balance to produce unappealing images not conducive with good communications.
· Limit or eliminate daylight. Mixing sunlight and any artificial lighting will produce color conflicts, and depending on the direction of the windows, can produce hot spots that will throw off the camera’s iris. Good shading is always recommended and blackout shades sometimes necessary.
CAMERA POSITION
· In rooms with dual monitors or projection screens, you’ll most often want to center the camera between the displays approximately level with far-end participants’ eyes.
· In rooms with one screen or a display that’s always used as the main screen, center the camera below the image, as close to the image as possible. If the camera is above, when people look at the projection screen or display, it will seem that they are looking down, which can be interpreted as a lack of interest. If the camera is below, on the other hand, they may appear to be looking slightly past those on the far-end feed, but they will appear attentive.
· Choose furniture carefully. If you use a straight or boat-shaped conference table, the camera’s view of some of the people seated there will be blocked, unless you raise the camera high over their heads, which of course will cause problems with eye contact. It’s better to use a wedge-shaped table with the open end toward the camera.
· In distance-learning classrooms or conference rooms with a podium, mount a second camera toward the back of the room, just high enough to clear the heads of people sitting or walking under it. Don’t mount the camera on the back wall; according to camera manufacturer Vaddio, PTZ cameras perform best in the middle of their zoom range, providing brighter images and smoother pan/tilt control. The ideal position depends on the resolution of the camera and the size of the room, but in larger rooms it may be better to use a ceiling mount or lift to move the camera in closer than it would be with a wall mount.