
Coming Home to Windows Home Server Part 35
Jan 3, 2011 12:00 PM,
By Eric B. Rux

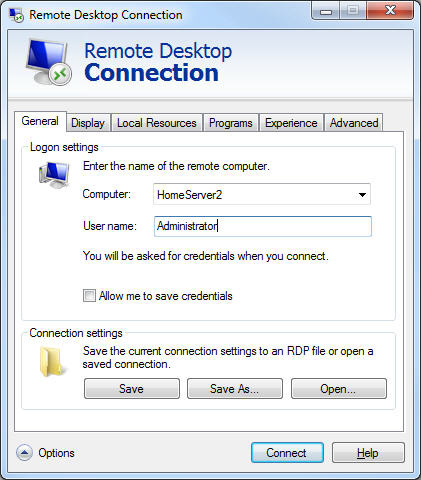
Figure 1. Use Remote Desktop to connect to your old Windows Home Server. You’ll be logging in as an administrator, so be careful while working in this environment.
I’m writing this month’s column over the Christmas break where I have had a lot of free time for “honey-do” lists. If you are not familiar with this topic, it is where your wife has a list of things for you to do and says, “Honey, do this,” and “Honey, do that.” Fortunately, I have also had plenty of time to do the things that I wanted to do, such as migrate our Home Server to newer (faster) hardware. It took my son, Joshua, and I the better part of the weekend, but we got it done.
As I started the process, it reminded me that this task will be very similar to migrating to Vail. As I have mentioned before, Microsoft does not currently have a “migration wizard” to help us move from WHS v1 to WHS v2 (aka: Vail). Instead, this will have to be done manually. If you’re an IT professional by day, then this probably doesn’t scare you that much, but if you are a typical Windows Home Server user, you may be left scratching your head. No worries; I’ll walk you through it, step-by-step.
Related Links

Coming Home to Windows Home Server Series
Welcome Home! In this series, Eric B. Rux—Windows Home Server MVP—breaks down the Windows Home Server (WHS) with useful tips, new add-ins, problems solvers, and the latest news. …
Here are the basic steps:
- Connect the new Windows Home Server to the network
- Copy the data from the old server to the new server
- Configure the server (Remote Access, etc.)
- Connect the clients to the new server
Connect the new Windows Home Server to the network
This process is simple, but there is one very big gotcha: The new server cannot exist on the network with the same name as your old Home Server. This is a basic rule of Widows networking, and one that isn’t easily ignored. If the name of the new server must be the same as the old one, then keep reading. I’ll cover that at the end of the article. For now, be sure that you name the server something unique. For example, if your old Home Server was called “HomeServer,” name the new server “HomeServer2.”
Do not install the client connector onto any XP or Windows 7 machines yet. We’ll do that later.
Copy the data from the old server to the new server
There are a couple of ways to accomplish this task, but I’m only going to deal with one: Copy the data over the network.
While this can be accomplished from your XP or Windows 7 computer, I will show you a faster way. First, make sure that both Home Servers are connected to the same switch using a network cable. Do not try this over a wireless connection.
Now, log onto the new Home Server via Remote Desktop. Normally, this would be ill-advised as you can actually damage your Home Server if you are not careful. To use Remote Desktop, find it in the Start menu or enter in “mstsc.exe” in the Run or Search window in the Start menu. (If that sounds like a strange program name for Remote Desktop, it’s because the command is actually an acronym for Microsoft Terminal Services Client.) Enter in the name of your new Home Server, and use Administrator for the User name as Figure 1 shows. Enter in the password of your Windows Home Server when prompted (this is the password you use when connecting new client computers to the server).
You will soon see the desktop of your new Home Server and promptly warned that you could do serious damage if you’re not careful. Close this window, and please be careful.
After all of that, we are now ready to start copying data.
Coming Home to Windows Home Server Part 35
Jan 3, 2011 12:00 PM,
By Eric B. Rux

Figure 2. Start by copying smaller folders first. Depending on the size of your Home Server, the transfer could take minutes, hours, or even days.
Click Start > Run (XP), or Start > Search (Win7) and enter in the name of your old Home Server: “\OldHomeServer” (the name of your server will obviously be different). Note that these slashes start from the bottom and go to the left. These are “back slashes” and are above the Enter key on most keyboards. The slash on the question mark key is different. That’s a forward slash, and it will not work for this task.
If both servers are talking correctly, you should see the network shares of the old Home Server show up in an Explorer window. Move this window to the side of the left side of the screen for later use.
Now, click Start > Windows Explorer and locate the folders that will hold the data. In some cases, you may have to create the folders. However, be sure to use the Windows Home Server Console/Dashboard to accomplish this task! Do not use Windows Explorer to create the folders.
You are now ready to start copying data. I suggest starting small and working your way up. For example, I copied my family’s folders under “Users” first. These folders had Word, Excel, and Power Point files, so they copied pretty quickly. I then tackled the Music folder, then the Photos folder, and finally the Videos. I also had some folders on my old Home Server that didn’t exist on the new server, so I simply created those via the Console/Dashboard first, and then copied the data.
Select the data from the Explorer window on the left, and drag the folder(s) to the appropriate folders on the new Home Server as Figure 2 shows.
Depending on the size of your Home Server, the copy process could take a few minutes, a couple of hours, or even a day or two. It’s not a hard process, just time-consuming.
Configure the server (Remote Access, etc.)
After the data has been copied to the new server, you can pat yourself on the back—you’re on the home stretch.
Configuring the new server is as simple as comparing the old and the new Console/Dashboard to the new Console/Dashboard. For example, Remote Access will need to be set up. Click on Settings > Remote Access and follow the wizards. Be sure to turn off Remote Access on the old server, too.
Go through each tab and setting to ensure that the new server matches the old server.
Connect the clients to the new server
If you want to rename the new Home Server so that it has the same name as the old one, do this now. First shut off the old Home Server. Then rename the new Home Server just like you would Windows XP or Windows 7. Click Start > Right Click on My Computer and choose Properties. Click the Computer Name Tab > Change. Enter in the name that you want in the Computer name box.
The last step is to point each Windows XP and Windows 7 computer to the new server. I recommend uninstalling the Windows Home Server Connector on each computer via Add/Remove Programs (Programs in Win7), which can be found in the Control Panel. Then, reinstall the connector using new connector software (\NewHomeServerSoftware). This method ensures that you are using the correct connector software and is easier than fiddling with the Registry, etc.
So there you have it. That’s how I spent the weekend with my 14-year-old (between being beaten soundly in ping pong). I hope you find this step-by-step useful. If you have questions, please do not hesitate to email me, and I will try to answer your questions.
Next month, I want to get back into Vail.
Oh, and happy New Year!
Eric B. Rux is a contributing editor for Windows IT Pro, and he writes a monthly column for Residential AV Presents Connected Home. Rux is the manager of Technical Support Services for Eastern Washington University and teaches the Microsoft Certified IT Professional (MCITP) certification program at a technical college.


