Shooting Your Own Installation Photos
Dec 4, 2009 12:25 PM,
By Don Kreski
Follow these guidelines for photography that will gain you marketing coverage.
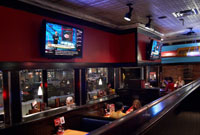
A TGI Friday’s in Chicago was shot for Sportscape/OnSite Network. The final image is a composite of two images, where I dropped a close-up of one of the monitors into the two screens later in Adobe PhotoShop.
How can you take and submit photos of your work to ensure they will be considered for coverage in print magazines?
A magazine needs two or three good photos to illustrate each story, but good photography is in short supply. A lot of great stories never run because the photos are not of acceptable quality and size, or the composition does not suit the format of a magazine cover.
My own view is that it’s well worth the cost of hiring a professional photographer to capture the work you do. But, with a little care and some basic equipment, many AV contractors can shoot good installation photos.

The Green Bay Packers Hall of Fame shot for Sharp Electronics. This shot is a composite of five separate images and would have been impossible to create had I not locked my camera very firmly on my tripod. I probably shot 200 or more images at various exposures to get the pieces I needed for this multi-layered file.
Equipment needs
A print magazine needs high-resolution images. In practice, a 6-megapixel camera is fine most of the time; 10 megapixels is better should the editor decide to use your shot across a full page or on the cover. Make sure you set your camera at its highest resolution and compose your images to fill, or nearly fill, the frame.
A wide-angle lens is a must. It’s hard to buy a lens that’s wide enough to work in a small boardroom or control room. For this reason alone, a point-and-shoot camera will not do the job. There are a few prosumer cameras with very wide zooms, but if you’re buying a new camera, consider one with interchangeable lenses. Buy as wide a lens as you can afford.
Manual exposure control, or at least an aperture-preferred mode where you can choose the lens setting (also called f/stop), is mandatory as well.
A camera that will shoot in RAW mode is well worth the extra cost. Because .raw files are large, you’ll need a lot of storage. I carry 30GB in flash memory, but you can probably get by on 16GB, possibly 8GB.
You need a tripod. Because conference rooms are often dark, and because you’ll want to shoot at a small aperture so more of the room will be in focus, your pictures will be fuzzy if you try to hold your camera rather than supporting it on a tripod. You will also want to take multiple exposures from the same spot, and that’s possible only with a tripod.

Boardroom at Calamos Investments shot for AVI-SPL. In this case I shot close ups of each screen image, then put them together later in PhotoShop. Each of the five images had its own color and exposure settings.
Composition basics
1. Clean up the area. You don’t want a ladder in the shot, a soda on a table, or the chairs at every angle and height. You have to look very carefully to see what’s askew, and it’s easy to miss a crooked drape or a knot of cables. I generally clean the whole room and straighten all the chairs, whether they’re in the shot or not, knowing that I will move the camera later and forget to check again. Take the opportunity to reduce the number of elements in the shot. If a potted plant is not adding to the story you’re telling, move it out. Your images will be used in conjunction with graphic elements such as headlines, so the simpler the better.
2. Take your time. I personally have to be in a room shooting photos for at least half an hour before I start to see what the finished image should look like. You can’t rush the process. Experiment with wide shots and very close-up shots of important elements. Be sure to shoot vertical images if you’re hoping for a magazine cover.
3. Pay attention to what’s on the projection or monitor screens. The screen is the focal point of most shots. Try projecting your customer’s website, but be prepared if it doesn’t look good. I often buy stock photos from an inexpensive site such as iStockphoto or BigStock and carry them in on my laptop. Otherwise, turn the monitors or projectors off, so you have a blank screen rather than an ugly screen.
Shooting Your Own Installation Photos
Dec 4, 2009 12:25 PM,
By Don Kreski
Follow these guidelines for photography that will gain you marketing coverage.

The Starbucks flagship store in Chicago, showing a videowall installed by Media Resources, Lisle, Ill. A composite of two images shot from the camera locked on its tripod: one with the color and exposure set for the room; the other set for the screens.
Color controls
Color can be tricky because architects often mix the types of lamps in a given room, and daylight may mix with artificial light. Each light source has its own color characteristics.
If you’re shooting to JPG images (standard for most digital cameras), you’ll need to be very careful with the color settings. There’s only so much you can do to fix them later. If your camera’s auto setting doesn’t give you a pleasing image, try the florescent, incandescent, and other settings. You’ll probably find that screen images look best with the camera set for daylight.
If you can shoot in RAW mode, you’ll be able to go back and choose your color settings later in the computer. Buy a neutral gray card at your camera store and shoot an image with it positioned so the most typical lighting falls on its face. (Be sure to put it away before you shoot your final shot.) Later on in the computer, you’ll click an eyedropper over the gray spot and the software will instantly adjust your color. There are other software adjustments as well, and if needed, you can keep playing with the color until you have something you like. Adobe PhotoShop (CS3 and later versions) includes a very good RAW processor, or you may prefer Capture One LE or Capture One Pro.

South Milwaukee High School auditorium, shot for Lewis Sound & Video, Waukesha, Wis. A composite of two images, each with its own exposure and color settings.
Exposure controls
Exposure can also be tricky. For the best results, set your camera on its aperture-preferred setting or on manual mode and choose a small aperture. (The larger numbers designate a smaller opening in the lens. You want f/11, f/16, or f/22.)
Be sure your on-camera flash is turned off. A single flash on the camera will not light the whole room or hall, but it will, at best, create a hot spot on the areas close to the camera. Note that with the aperture at f/11 and the flash turned off, your shutter will probably stay open for several seconds. That’s fine as long as the camera is on a tripod with the tripod head locked.
Bracket your exposures: Take several images at faster and slower shutter speeds than what the camera tells you is correct. See your manual, but most likely you’ll need to press a +/- button to change the exposure.
Bracketing helps in two ways: 1. Often the camera’s monitor is darker or lighter than it should be, so you’re protected against an easy, but crucial mistake. 2. The screen image often requires a very different exposure than the rest of the room. For best results, you’ll probably need to combine one shot of the room with a separate shot of the screen in PhotoShop.
The screen will also, most likely, require a different color setting than the rest of your shot, and you have the choice of whether to fix it or leave it alone. I have a strong bias against leaving it alone. It’s true that a washed-out, cyan-tinted screen is more naturalistic than a corrected screen, if only because that’s how the camera actually sees it. It’s not how our eyes see it, however. Our eyes instantly adjust to the brightness and color of a projected image when we focus our attention on it.
One step at a time
I realize that not everyone will be able to do what I’m suggesting, at least not on the first try, and so I’ve been careful to put my advice in priority order. Start out by buying a decent camera and a tripod. Pay attention to the composition and play with your color controls until you have something that looks good in the camera’s monitor. At that point, you should have an acceptable photo.
It will get better if you can shoot in RAW mode, bracket your exposures, and combine images in PhotoShop. Hiring out just the PhotoShop work is always possible and a lot less expensive than hiring a photographer to do the whole job. (Contact me if you have trouble finding someone to help.) And if you want your images to be considered for a magazine, study the cover composition and ask for art guidelines as to resolution, image size, format, etc., from the editors in advance. That will greatly increase your chances of seeing your installation in print.
Don Kreski is the president of Kreski Marketing Consultants, offering marketing services to the AV industry. You can reach him at www.kreski.com/contact.html.