Coming Home to Windows Home Server Part 39: Installing WHS 2011 in detail
May 3, 2011 10:55 AM,
by Eric B. Rux
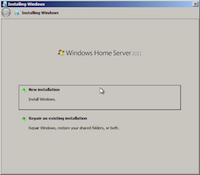
Figure 1
Last month, we discussed the general availability of Windows Home Server 2011. Now it’s time to really dig into this product—so this month, I’m going to discuss my experience installing Microsoft’s latest operating system. You can follow along as you install your own copy of WHS.
As I briefly mentioned last November, you will need a 1.4GHzx64 processor, 1GB RAM, and at least one 160GB (or larger) hard drive. Again, these are minimums, so be sure your hardware has a little more juice before starting the installation.
Booting the DVD should start the installation, and looks like figure 1. Click on “New installation.”

Figure 2
After a few seconds, the installer should find your hard drive(s) as figure 2 shows. Click the checkbox that confirms that you understand that the data on the primary disk will be deleted, then click Install.

Figure 3

Figure 4

Figure 5
The installation will continue much like a normal Windows Vista/7 or 2008 Server installation as figure 3 shows. After a few minutes, the Home Server will reboot and finish the installation, as shown in figure 4, and then log onto the Desktop automatically the first time where the last few installation tasks are finished up, as shown in figure 5.
Windows Home Server 2011 is just about installed at this time—there are just a few remaining tasks to complete:

Figure 6

Figure 7

Figure 8

Figure 9
Country, figure 6
Date and Time, figure 7
Agree to the License Terms, figure 8
Enter the Product Key, figure 9

Figure 10
Now here is where is starts getting real interesting: Personalizing your server, as shown in figure 10. When personalizing your server, be sure that the server name is no longer than 15 characters. Microsoft also has some very specific rules that you must follow: Must not start with a dash, contain any spaces, or contain ONLY numbers (you can have numbers in the name—it just has to have at least one letter). Like all computer names, it can contain letters, numbers and dashes….just as long as you do not violate any of the rules above.
The password should be hard to guess! Remember, your “life” is stored on this computer, and the password is the gatekeeper. Your password should be at least eight characters long, and must contain three of the four character types:

Figure 10b
UPPER CASE
lower case
1234567890 (numbers)
!@#$%^&* (special characters / symbols)
Your password hint is exactly that—a HINT. Never use the actual password as a password hint (figure 10b).

Figure 11
Finally, there are some “reserved words” that you cannot use as a server name. There are too many to list here, but rest assured that if you try to use one, you will be greeted with an error message, like in figure 11.

Figure 12
When prompted to keep your server up-to-date, I suggest that you keep the default (figure 12) “Use recommended settings” as this will ensure that your Home Server always has the latest and greatest patches—even if you are not paying attention.

Figure 13
After all of that, the installation routine still has some configuration to complete (figure 13). Depending on the speed of your computer, this could take some time, so sit back, relax, and grab a cup of coffee. Your server will reboot quite a few times, so be patient.

Figure 14
Soon, you will be rewarded for your efforts, as the final screenshot shows in figure 14.
That’s it! You now have installed Windows Home Server 2011.
Have you installed the latest version of Windows Home Server yet? How did it go? Any problems? Let me know, and you may be featured in this column!