Coming Home to Windows Server, Part 21
Oct 5, 2009 12:08 PM,
By Eric B. Rux
Windows SteadyState
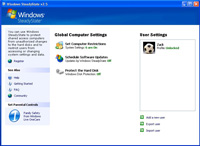
Windows SteadyState. For a larger image, click here.
If you’re reading this column, then you probably either deploy and support Windows Home Server as part of your business (home audio installer, etc.), or have one in your own home. No matter which situation you find yourself in, a common problem exists: How can we prevent the PCs connected to our home network from getting all out of whack? Fortunately, I’m a computer professional by day (Windows Home Server guru and author by night), so I have the skills to quickly rebuild my family’s numerous computers. But even then, I find myself rebuilding a computer or two about once or twice a year. No matter how many times I tell my family to be careful, the computer always gets cluttered with rogue software and the other Windows crud that builds up over time. If you don’t have the skills to easily rebuild a PC, then you probably end up just living with a really slow computer. There has got to be a better way.
That better way I’ve found is a little known free product from Microsoft called Windows SteadyState. It augments the typical family that has a couple of computers and a Windows Home Server. (You don’t need to have a Home Server to use SteadyState, but it can come in handy as I’ll show later on.) I learned about this product from Matt Feider, a computer aided drawing (CAD) administrator where I work. We were having a discussion on methods to limit the damage that a typical user can do to a computer, and he mentioned this free tool. After I tried it out, I knew that I had to share it with you.
Windows SteadyState is available as a free download from Microsoft. After a quick Genuine Advantage check, you can download the 6MB file to your desktop and start the installation routine. Keep in mind, however, that Windows SteadyState only works on Windows XP and Vista; Windows 7 is not supported. (I know, I tried it.) It also only works on 32-bit installations as 64bit is specifically listed as not supported in the documentation. (If anyone from Microsoft is readying this, please port this application to 64-bit. I don’t have a problem defending you when third-party software/hardware vendors fail to support 64-bit, but when you do it, it’s inexcusable.)
After the installation has finished, double click on the Windows SteadyState icon on the Desktop. The first thing that you’ll notice is that the help screen is immediately displayed. Be sure to refer to this screen if you’re not sure how to accomplish a specific task.
This application is pretty robust, and you can do a lot with it. To get you started, though, I’ll walk through a typical scenario: Prevent a specific user from making changes to the Windows configuration or installing software.
The first step is to create a user account for the person that you want to keep locked down. I’ll call my user account “Zack”. From the Windows SteadyState window, click “Add a new user” in the lower right-hand corner. After you enter the username and password, you can choose a picture for the user and then click OK.
Now here’s where it gets fun. The next screen lets you lock down the user with just about every conceivable method that you can think of. For example, Zack will not be able to make any permanent changes to Windows, cannot access the local hard drive, is only allowed on the “wholesomegoodness.com” website, and is blocked from playing games. If Zack is your teenage son, then he will probably not be happy with this setup, but you will be able to breathe a sigh of relief knowing that you will not have to rebuild his PC anytime soon.
If you have more than one PC in your house, then this next step is very important: Be sure to export Zack’s settings and import them onto the rest of the computers in the house. Simply click “Export” and follow the instructions to create a .ssu file. Copy this file to your Windows Home Server onto a share that only you have access to. Then, visit each PC in your home, install Windows Steady State, and import Zack’s .ssu file.
In addition to locking down the younger members of your family, you can also use Windows SteadyState to control software updates, who has access to the hard drive, and define further Internet restrictions with Windows Live OneCare integration.
No matter if you have a home network with a bunch of PCs connected together, or are a single PC family, Windows SteadyState can really help you keep control over who can make configuration changes. If you install and support Windows Home Server as part of your business, Windows SteadyState is a free utility that you can make part of your service offering. Either way, this handy application should help keep your PC healthy a little longer.


