
Digital Rapids TouchStream
Feb 15, 2011 10:52 AM,
by Jan Ozer
A live event encoding appliance with simple operation.
Digital Rapids TouchStream
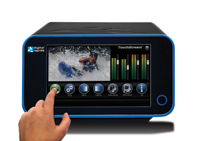
The ideal streaming appliance would combine extraordinary ease-of-use for nontechnical users in the field, a highly configurable interface for streaming professionals back at the office, and high-quality, multiple-format output. By this measure, the Digital Rapids TouchStream appliance is pretty much ideal and should definitely be considered by companies, schools, churches, and entertainment venues seeking a mobile streaming appliance.
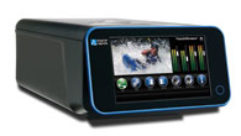
The unit itself is a touchscreen-operated Windows XP computer with various analog and digital acquisition configurations that I’ll discuss in a moment. The hardware is slightly larger than a breadbox (about 16”x9”x6” tall), and weighs about 8lbs., so is fairly portable, and the 800×480 touchscreen tilts up and out for easy viewing.
With video preview and audio volume meters, the touchscreen lets you easily adjust saturation, brightness, and contrast in the field, as well as enable and disable noise reduction if you’re working in low light. This is an advantage over systems that don’t offer video preview except via separate monitor. You can connect a keyboard, mouse, and monitor to the unit for easy configuration in the office, and then hand it over to the presentation staff to drive solely with the touchscreen.
The unit comes in three basic hardware configurations: analog, SDI, and HD-SDI, with connectors well-documented on the Digital Rapids website. Pricing starts at $3,995, and it varies by hardware configuration and the codecs supported. Supported codecs can include H.264 for Flash, Silverlight, QuickTime, and iOS devices; VP6; VC-1; and MPEG-2 with the appropriate audio. The TouchStream can also produce different formats simultaneously, such as a VP6 stream for Flash broadcast and H.264 for iOS devices.
Adaptive streaming support is extensive; the unit can produce segmented streams for Apple’s HTTP Live Streaming, VC-1 and H.264 streams for Silverlight Smooth Streaming, and H.264 streams for Flash dynamic streaming. This is a nice bit of future proofing because if your clients aren’t adaptively streaming now, they should definitely be thinking about it in the very short term.
For the record, I tested the analog model—with VC-1, H.264, and iOS device formatting and segmenting—which would have retailed for $6,140. The CPU in the unit was a 2.4GHz Intel Core 2 Quad with 1GB of RAM and an embedded Intel graphics controller. Analog capture and preprocessing is provided by an embedded Digital Rapids DRC-500 capture card that you can buy separately for $895 or more, depending upon formats supported. Basically, Digital Rapids built the TouchStream around its own proven board designs, adding the portable case, convenient touchscreen, and the additional software that pulls it all together.
To test the unit, I used multiple-source videos, including a simulated live event from a ballet performed in a high school gym by my wife’s ballet company. I say “simulated” because the high school couldn’t get me Internet connectivity in time to actually stream the event live. Instead, I shot three ballet performances over the weekend and streamed several in full length from tape to test the TouchStream’s robustness. I tested live streaming of Flash (H.264) and Windows Media using a demo account provided by Detroit-based content delivery network company PowerStream.
Driving in the Field

Figure 1. TouchStream’s menu makes it easy to identify functions such as Start and other controls and setting.
If the TouchStream is preconfigured back at the office, field operation is exceptionally simple. When you boot the appliance, the TouchStream software loads automatically, and you can arm the system so that all the user has to do is plug in the Ethernet cable and audio/video connectors, and press Start when they’re ready to begin streaming (Figure 1). You’ll want to check your work by logging into the landing page for the live stream, but if there’s video in the embedded preview monitor, and no error messages, you should be streaming.

Figure 2. The Picture Controls menu allows users to adjust brightness, contrast, saturation, and tint as well as deploy spatial and temporal noise reduction.
Once you’re up and running, you can click the Video Settings button to adjust brightness, contrast, saturation, and tint, as well as deploy both spatial and temporal noise reduction—all while you’re encoding (Figure 2). You can also display a graphic overlay that you can fade in and out. You can’t crop while encoding, however, you have to do that before you start. Of course, you can also adjust audio levels while encoding.
Digital Rapids TouchStream
Feb 15, 2011 10:52 AM,
by Jan Ozer
A live event encoding appliance with simple operation.

Figure 3. TouchStream ships with canned project presets, which you can select from the Project Setting menu. Alternatively, you can customize a preset or build one using the TouchStream Config program.
Things get a bit more complicated if the user is configuring their own webcasts in the field. That is, you have to configure three options to start streaming: project, input, and output(s).
Digital Rapids ships the TouchStream with dozens of project presets, including single and adaptive streaming, which vary by stream count, resolution, and data rate. If you can use one of the canned presets, life is simple; you simply choose it as shown in Figure 3 and move to the next step. If you can’t, you have to exit the TouchStream software, run the TouchStream Config program, and either customize an existing preset or build one from scratch—an activity best performed with a monitor, keyboard and mouse, and no event promoter hovering nearby wondering when you’ll be ready to start. I briefly describe the TouchStream Config program below.

Figure 4. Choosing the input settings.
After choosing the preset, you select your audio and video input, as shown in Figure 4. One bummer about the analog unit that I tested is the lack of component analog support or DV support. You’ll need the SD-SDI model for that. I shot the ballets with two HDV cameras, and quickly remembered that my front, close-up camera, the Canon XH A1, doesn’t have S-Video output. So I switched over to my back camera—the venerable Sony HDR-FX1—which did have S-Video output for my tests.
This is definitely presentation 101 kind of information, but the end-user should never let a streaming appliance leave the building without fully connecting the audio/video feeds from the camera you’ll be using to the appliance and producing a live test stream. It took me 45 minutes to find an S-Video connector, and I ended up very glad that the high school couldn’t provide Internet connectivity because the pressure to make it all work in realtime would have been a bit too much.
After choosing your input settings, you choose your output settings, including the server URL, stream name, login/password if necessary, and the like. This part is actually pretty simple. In my case, PowerStream sent a text configuration file with server ID, URL, login name, and the like that mapped perfectly with the TouchStream’s output settings. If the end-user is working with an internal server, the output settings should probably be preconfigured before leaving for the event to make sure the login information is correct.

Figure 5. Output settings.
I copied the PowerStream configuration file to the TouchStream’s hard drive, and copied and pasted the data in. Failing this, you can revert to the touchscreen-based keyboard, which would absolutely stink if you were writing War and Peace, but it functions well in its limited role and beats lugging a keyboard around.
After setting and checking your project, input, and output settings, you click Trigger (see Figure 4) to choose how to start and stop the encoding, which can be manual, scheduled, or via GPI—a custom general purpose hardware interface between two devices. I used manual in all my tests. Then you click Arm, which brings up the start button shown in Figure 1. Click that, and you should be streaming.
Digital Rapids TouchStream
Feb 15, 2011 10:52 AM,
by Jan Ozer
A live event encoding appliance with simple operation.

Figure 6. The Trigger Settings control when to start and stop encoding.
Rolling Your Own Presets
As mentioned above, if you can’t find a canned project preset that you can use as is, you have to exit the TouchStream software and create your own in the TouchStream Config program, which is really a version of the Stream Live software that ships with the DCR-500 boardthat powers the TouchStream unit. Where the main TouchStream program shields you from technical details, the Stream Live program doesn’t, and probably can’t, because that’s where you set the down-and-dirty codec-specific encoding and preprocessing options.

Figure 7. You customize and create presets in the
StreamLive software.
Streaming professionals will have no trouble working in this program, but it’s far beyond the capabilities of nontechnical users. You can check out an interface tour at www.digital-rapids.com/layouts/Stream23_GUI_Tour.html. If you’re sending a novice user out in the field with the TouchStream, make sure you have a project preset that works, so they don’t have to try to work through Stream Live on the fly.
Testing

Figure 8. A live Windows Media stream encoded by TouchStream and delivered by PowerStream.
I performed multiple tests over the several days of testing, producing both H.264-based Flash and Windows Media video files via the PowerStream CDN and creating archive copies. I streamed all files at 640x360x29.97 frames per second at a video data rate of 600kbps, with 64kbps mono audio. Quality was uniformly good, particularly considering that most of the source was interlaced video shot under low light conditions.
In single file encodes, CPU utilization seldom strayed above 25 percent, and there were no dropped frames in the files I analyzed. Figure 9 shows the information screen while encoding three streams of H.264 video; again, there were no dropped frames, with CPU use peaking at around 70 percent.

Figure 9. Performance while encoding three H.264 streams.
Overall, I found the TouchStream usable and highly functional. Like most streaming appliances, it is fairly noisy. It takes a big fan to cool a quad-core CPU enclosed in a small metal box. Plan on locating the unit away from any noise-sensitive spots. Though the cursor control works OK on the touchscreen, things will go infinitely better with a USB mouse, so be sure to bring one along. Otherwise, if I was buying a streaming appliance, the TouchStream would be number one on my short list.
Product Summary
- Company: Digital Rapids
- www.digital-rapids.com
- Product: TouchStream Appliances
- Pros: Easily adjustable in the field; onboard touchscreen; can connect keyboard, mouse, and monitor to the unit for easy configuration in the office; good uniform quality, especially in low light conditions.
- Cons: Creating custom presets too complicated for nontechnical end-users; have to have the SD-SDI model for component analog support or DV support; fairly noisy.
- Applications: Live houses of worship, education, corporate, and entertainment events.
- Price: Starts at $3,995
SDI model
HD-SDI model
Specifications
Analog model
- S-Video and composite analog video input
- XLR and RCA audio input with maximum 480i (NTSC) 576i (PAL) input and four audio processing channels.
- SDI video and embedded SDI audio inputs standard
- AES/EBU stereo audio and analog audio and video inputs optional with maximum 480i (NTSC) 576i (PAL) input and four audio processing channels.
- HD/SD SDI video and embedded SDI audio, with AES/EBU stereo audio input optional with maximum 1080i, 1080p and 720p HD input and 480i (NTSC) 576i (PAL) SD input and four audio processing channels.


