Telestream Wirecast Pro 4.0
Apr 6, 2011 1:11 PM,
by Jan Ozer
Software-basedsolutions for yourlive streamingneeds.
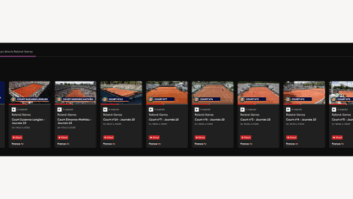
Figure 1. The Telestream
Wirecast Pro interface
showing the available
cameras.
While you’ve likely got the necessary gear to stream from your offices or studio, you’ve probably started hearing requests for streaming in the field, perhaps on-location at a corporate event or conference. For these types of ad hoc streaming, you have two choices: a standalone hardware encoder like the Digital Rapids Touchstream appliance that we reviewed last month, or live streaming software programs installed on one of the ubiquitous notebooks that your organization already owns. Over this and one subsequent review, I’ll look at three such live streaming software products.
Specifically, in this review, I’ll look at Telestream Wirecast Pro 4.0, which is the most well-featured of the group. In upcoming issues, I’ll review Adobe’s Flash Live Media Encoder and Microsoft’s Expression Encoder 4. (Editors note: Telestream will show v4.1 at NAB adding screen capture with audio support, LiveU video-over-cellular for portable backpack integration, Teradek Cube integration for HD-SDI or HDMI cameras, and integrated support for Matrox Multi and Osprey capture cards).
Speeds and Feeds
Let’s start with the basics. Wirecast comes in two versions for both Mac and Windows; Wirecast ($449) and Wirecast Pro ($995), which includes all the capabilities of the basic program, plus 3D virtual sets, integrated scorecards for sports broadcasts, support for IP cameras and Telestream’s Pipeline video capture device, and support for HDV cameras. If all you need are the basics and HDV support, you can add HDV to Wirecast for $99.
Wirecast can accept input from a number of different sources, including webcam, FireWire and various BlackMagic cards (v4.1 adds Matrox Multi and Osprey cards plus LiveU and Teradek Cube), and outputs in Flash, Windows Media and QuickTime formats, and can output multiple formats simultaneously.
In case you didn’t get it from the mention of virtual sets and integrated scorecards above, what separates Wirecast from the live software encoding pack are live production capabilities like multiple camera switching with transitions, titling, and the ability to play disk-based files and screen-based input from other computers on a network (v4.1 adds audio in addition to existing video).
Figure 1 shows the interface from a recent live broadcast I produced at a local church. On the left is the preview, on the right the encoded stream. You can see the broadcast statistics just above the dual preview window.
On the bottom left of the interface, you see the five layers of content, which includes Titles, Master Layers 2, 4 and 5, and Camera, which is the selected layer. This is a single camera shoot, so you see one Blank Shot (that’s always there by default), the selected Canon XH A1 camera that I used at the shoot, and Hillsville.tiff, which is screen I showed before the event went live.
To switch from Hillville.tiff to the live camera (or to switch between cameras in a multi-camera production), I click the XH A1 icon, which automatically switches using the transition selected below the two preview windows (Cut, Smooth or Page Curl). If I want to preview the camera on the left, and then switch over manually, I would click the green light next to the Go button on the right, disabling the AutoLive function. Then, when I clicked the camera, it would preview on the left, and wouldn’t switch over until I clicked the Go button.

Figure 2. Titles that I used in this church
production.
Figure 2 shows the titles that I used in the production, one for the pastor, and one for the guest speaker, Robert Baker, who’s shown in Figure 1. The same method applies for previewing and displaying the titles as with the cameras, clicking the Blank Shot on the left when you want the title to go away.
Starting at the Top
Now that you’ve got a high-level view, let’s dig into the details. You can encapsulate the basic parameters of each broadcast—inputs, titles, outputs, live streaming server settings—in a separate Wirecast document. That way, if you have three teams using a single notebook, you can configure separate broadcast parameters for all three, and all they have to do is load the right document file, connect and turn on the camera, and click Broadcast.
You set the aspect ratio of the presentation—4:3, 16:9, and others—via a menu option. Then you start adding shots to the broadcast. Shots can be cameras, webcams, still image files, video files, or application screens from either the same computer or other computers on a network. Shots can also be combinations of multiple inputs.

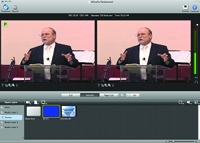
Figure 3. Creating shots, including this one combining a PowerPoint presentation and webcam.
For example, Figure 3 shows a shot that combines a PowerPoint presentation and a webcam, simulating an executive briefing. Wirecast gives you a tremendous amount of control over presentation, so you can show the two windows side by side, top or bottom, and customize the size and placement of the picture-in-picture video.
Though I’m showing PowerPoint in the background, it could also be a document or any other application. You could also demonstrate how to change a style on Word or discuss a workflow diagram. If you’re adding a video file to the presentation, you can configure the in and out points, as well as whether the video stops after playing, or loops, the latter a nice touch during intermissions and other breaks. You can also greenscreen your on-demand or live content, placing any source within a virtual set or background. Once you’re done adding shots, you can click and drag them into the desired order so you can easily select them during the show and name them accordingly.
Telestream Wirecast Pro 4.0
Apr 6, 2011 1:11 PM,
by Jan Ozer
Software-basedsolutions for yourlive streamingneeds.

Figure 4.
Setting the in
and out points
for a video I ’m
adding to the
production.
Once you create your shots, add titles via the simple interface shown in
Figure 4, with lots of templates, and font options. You can add backgrounds
to display should your video or content not fill the screen, and bugs or watermarks to display over your video.

Figure 6. Configuring encoder
and broadcast settings.
You configure your outputs in the Broadcast Settings dialog, shown in Figure 6. Each of the lines in the top left window is a separate output. The program can produce multiple streams for Flash and Windows-based adaptive streaming. If you’re streaming live, input the server coordinates in the Address and Stream boxes shown below.
When producing for Flash distribution, Wirecast supports both VP6 and H.264. You can choose any codec for QuickTime broadcasts, though most producers will use either MPEG-4 or H.264, and Windows Media producers can choose any WMV video and audio codec.
I produced the church broadcast on a 3.06 GHz Core2Duo-based MacBook Pro, broadcasting a 480×360 file at a combined audio/video data rate of 432kbps, with these conservative parameters dictated by the wireless connection to the church’s router, which measured under 800kbps upload speed according to www.speedtest.net. As you saw in Figure 1, broadcasting at these parameters consumed around 54% of the Mac’s CPU, so I probably couldn’t have gone much larger anyway.

Figure 7. Setting
capture size to Native to
maximize quality.
In general, Wirecast’s output quality is quite good, though there’s at least one potential speed bump along the way. When you install a new camera, Wirecast assigns the device a capture size, as shown in Figure 7. In many of my tests, the initial assigned size was Low, which reduced input quality and visibly degraded output quality. I’m guessing that Telestream does this to reduce the CPU requirements of the capture/encode, but if you don’t have enough horsepower to capture Native video, you probably shouldn’t broadcast with Wirecast. Either way, get in the habit of checking your source settings for every camera that you use with Wirecast.
Wirecast’s performance will definitely scale well with faster computers. For example, I tested Wirecast on a Hewlett Packard 8740w mobile workstation with a 2.0 GHz four-core i7 processor (8-cores with hyper-threading enabled), which was able to produce three streams (640×480 at 732kbps, 480×360 at 432kbps and 320×240 at 232kbps) at an efficient 25% total CPU utilization. Working with a Decklink card attached to the Express Card slot of the 8740w, I was able to capture 1080i video and produce four streams at under 75% CPU utilization, which is impressive. Overall, Wirecast combines excellent overall functionality with very good output quality and efficiency. If you’re considering a software-based live encoding solution, it should definitely be on your short list.
Product Summary
- Company: Telestream
www.telestream.net - Product: Wirecast Pro
- Pros: Cross-platform, extensive production capabilites (multicamera switching, ability to stream multiple formats)
- Cons: Configuring new cameras can be confusing
- Applications: Any live event that needs realtime streaming or capture to disk
- Price: $995
Specifications
Windows Requirements
- 2.3GH z processor, 1GB RAM
- QuickTime 7.5, DirectX 9.0c
- 200MB HD space to install, more to record to disk
- 32MB PCI -Express graphics card with 3D acceleration (GeForce or Radeon recommended)
- Sufficient upload speed
Mac OS Requirements
- OS X 10.5 or later
- Intel processor or Power PC G5
- QuickTime 7, QTSS/DSS 4.1.3 for automatic “announce” unicasting
- 200MB HD space to install, more to record to disk
- Quartz Extreme-capable graphics card