Systems for video production, streaming, live events, and security are loaded with computers—and control rooms are loaded with keyboards, monitors, and mouse(s), or other controllers. In this universe, KVM matrix switches save desk space and increase convenience. And while KVM-over-IP is great if access across a network, or over the internet, is desired, for local installations direct-connect KVM is simpler, less expensive, and requires no networking.
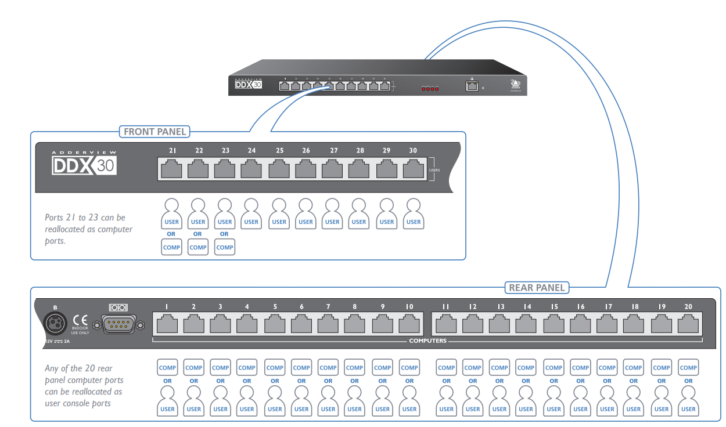
Direct-connect matrices long ago moved from proprietary breakout cables (with VGA, P/S2 and other connections) to systems using “category” cable between devices. Adder’s DDX family consists of two matrix sizes, the DDX10 and 30, the DDX-USR user station, and several Computer Access Modules (CAMs). The CAMs—with USB and either Display Port, DVI or VGA video—live at the computers, with a single CAT6 connection to the matrix. Each user location has a DDX-USR for connection of keyboard, mouse and DVI video, also linked to the matrix via CAT6. Both matrices allow any of their ports to be used for a computer (input) or user (output).
The DDX products have stated max video specs of 1920×1200@60Hz, which is just fine for most control applications, UCC conferencing, internet browsing, etc. Some other switches will go higher, and perhaps this is useful for something like video editing, but it also means the displays must be large enough to avoid presenting an “eye chart” to the user. As an aside, while 1920×1080 is most common, I find that the 16:10 aspect of 1920×1200 is actually more useful for control functions, although displays are becoming rare.
From the factory, the default switch configuration assigns several ports for users and the rest as computers. If this fits your needs, it’s possible to use the switch without any further tweaks. But it’s likely you’ll want to configure the system using a browser and network connection. The switch will attempt to get an IP address via DHCP but will otherwise fall back to a static address (thank you, Adder). Instructions for connecting and accessing the webGUI are clearly described in the manual, and the IP address is also shown in the On-Screen Display of connected user stations.
Once logged in you can configure port types and names, assign users and access permissions, change IP settings, set EDIDs, and various other functions. The GUI is clearly organized and easy to use. A distinction is made between Computers and Transmitters (DDX-CAM), and between Consoles and Receivers (DDX-USR). This may seem counterintuitive at first, but the organization helps keep track of naming and other parameters within the system. Don’t forget to click UPDATE when you’ve made changes in any of the windows!
Using the switch is as easy as pressing CTRL+ALT+M at any user station (the default shortcut) which brings up the On-Screen Display after a couple seconds—be patient. The OSD is a graphic view of the available computers, with thumbnails of recent video images, and icons overlaid for selecting how to view and control a computer. Use the mouse or arrow keys to move around the OSD. Once a computer window is highlighted (red border) pressing Return (or clicking the “sharing” icon) selects normal shared access. Note that clicking on the eye icon only switches the video, not control, which can lead to some confusion. Other modes are clearly explained in the manual.
Once the computer and access mode are selected, a few seconds will pass before the desired computer appears. At that point the computer can be used as though the keyboard, monitor, and mouse were plugged straight into the back. The system supports devices up to USB2.0, with several ports available on the DDX-USR. Audio is available, with analog connections for mic and speaker at the USR end. At the computer those devices appear as USB-audio devices selectable within the control panel of the operating system. Lastly, DDX also supports multiple display (multi-head) configurations.
One nice perk is that a DDX-CAM and USR can be connected directly together as a KVM extender. This could be a handy use for extra parts, or if the matrix should fail for some reason. In that case coupling input and output cables behind the matrix would still allow use of computers while repairs are underway. There are indicator lights on all devices that show power and link connections (the DDX-CAM is powered by USB from the computer).
Adder makes emphatic recommendations about the need for CAT6 shielded cable in order to get the best performance, and I would certainly go that route for new installs. But I have found in practice that the switch works beautifully with CAT6 unshielded, and even CAT5 cable over fairly short distances (roughly 50ft). This allowed the use of existing cables in a situation where replacing them would have been ugly. I am sure Adder would not endorse this practice, but I appreciate that the equipment is designed well enough to work under challenging conditions.
My experience with Adder KVM products goes back a few generations and I have always been happy with them. Support, when rarely needed, has been sufficient, if not glorious. The DDX system is the most mature of the Adder direct-connect switches I’ve used and everything has worked perfectly out of the box in multiple installs. No support required.