Introduction
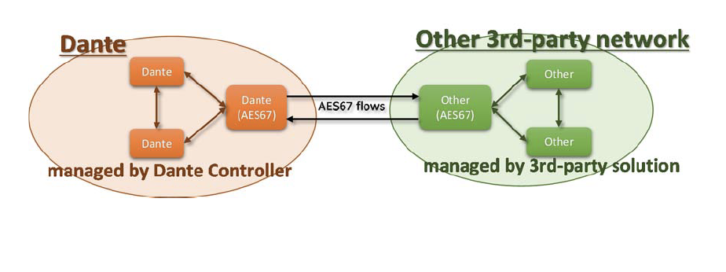
 AES67 is a published standard which defines interoperability guidelines for high performance professional digital IP networking. AES67 provides the means for exchanging audio streams between areas with different networking solutions or technologies already in place, such as Dante, Ravenna, Q-LAN, Livewire, and WheatNet. Yamaha also has started to successively update Dante products to support the AES67 standard beginning with the CL/QL series consoles and R series I/O racks. However, please understand that AES67 is a transport option as part of Dante but will not be a replacement of Dante. This is because Dante is a complete audio networking solution, including control & monitoring software, network redundancy, and automatic device discovery, while AES67 has limited functionality to achieve wider interoperability as described below. This document describes general instructions to connect Yamaha Dante devices with 3rd party non-Dante AES67 devices. For details on the 3rd-party device setup, please refer to the documents each manufacturer provides as well.
Feature Summary
Dante Controller v3.6.2.4 and later supports the AES67-enabled Dante devices, but as of January 2017, the following requirements and limitations are applied to the use of AES67 with Dante.
-SAP (Session Announcement Protocol) must be supported.
This is one of four device discovery methods referenced in the AES67 standard.mCheck if the transmitting non-Dante AES67 device supports SAP. Otherwise Dante Controller cannot discover the audio flows coming from the device. Dante devices support SAP if their AES67 mode is enabled. Even if the non-Dante AES67 device does not directly support SAP, the vendor may have a software conversion tool available, providing wider compatibility, such as ALC NetworX RAV2SAP.
-Multicast flow only (unicast is not supported yet).
-Up to 8 channels per flow.
-Multicast IP addresses must be in the range of 239.69.0.0 – 239.69.255.255/16.
In addition, the same network address range must be specified for other AES67devices transmitting to Dante devices.
-48 kHz sampling rate only.
The Dante audio flows from/to the device will also be limited to 48 kHz if the device isengaged in AES67 mode.
-24 bit (L24) only for transmission and reception.
-2 milliseconds fixed latency for reception.
-Primary network only (redundant network is not defined within the AES67 standard).
-100 Mbps or slower connections are not supported.
In addition, please be aware of the following notes due to known issues.
-Initialize the Dante module before the AES67 mode is enabled.
-Do not change the TX multicast address prefix (default 239.69).
-Do not change the bit depth (default 24 bit) from Dante Controller or the console after enabling the AES67 mode. Rebooting the device or Dante module with the change could reset the multicast addresses if using a different multicast address prefix other than default 239.69, which would cause audio interruption.
-Do not change the multicast addresses and labels of non-Dante AES67 transmission flows patched to Dante AES67 devices. The change could cause audio interruption.
-If the device labels are changed, reboot the Dante module. The AES67 transmission flow labels will not be updated until after the reboot.
Configuring the Dante devices
1. Open the AES67 Config tab of the device in Dante Controller v3.6.2.4 or later. The tab will not appear if the device firmware does not support AES67 yet.
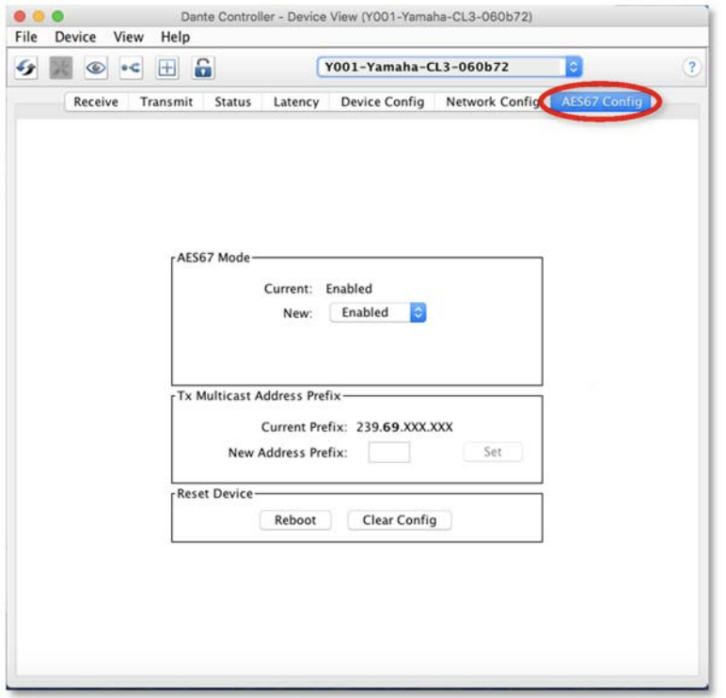
2. Execute “Clear Config” to initialize the Dante module for avoiding known issues.
3. Enable the AES67 mode. Reboot will be needed if the AES67 mode was disabled. Only devices that intend to transmit or receive AES67 flows need to have AES67 mode enabled. It is also possible to communicate between AES67-enabled Dante devices and standard (AES67-disabled) Dante devices at the same time.
4. Make sure the Tx Multicast Address Prefix (2nd octet) is set to 69 (default).
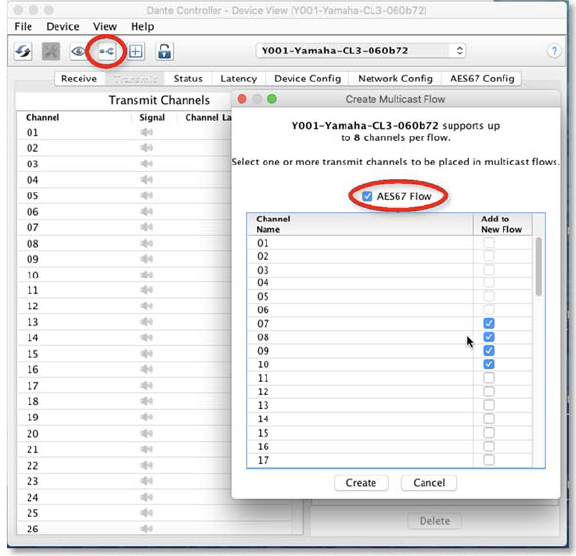
5. Create AES67 multicast transmission flows in Device View as usual, but tick “AES67 flow” first, before selecting which channels should be received by the non-Dante AES67 devices.
Configuring the non-Dante devices
1. Make sure the non-Dante devices support SAP for automatic device discovery by Dante Controller.
2. Configure them in AES67 mode, though the methods may be different for each device. For details, please follow the instructions provided by each manufacturer. Make sure to specify the same multicast network address prefix that you specified for the Dante devices.
3. Create some AES67 multicast transmission flows (following the method described by each manufacturer), which should be recognized by Dante Controller, and then patched to the AES67-enabled Dante devices.
Making the patches to the Dante devices
1. Open the Routing tab on Dante Controller. The non-Dante AES67 devices will appear in blue as the transmitters.

2. Make the input patches from the non-Dante AES67 devices as usual. Click the channel intersections in the grid, or drag and drop in the Device View Receive window. Dante Controller cannot make any patch to the non-Dante AES67 devices, because only the multicast audio flows coming from non-Dante AES67 devices can be found by Dante Controller, not the devices themselves. In other words, Dante Controller can only create AES67 multicast flows sent from the Dante devices, and patch the AES67 multicast flows which are sent from the non-Dante devices to the Dante devices.
Making the patches to the non-Dante devices
Dante Controller cannot make the patches to the non-Dante AES67 devices as described above. For details, please follow the instructions provided by the device manufacturer.
Clocking Notices
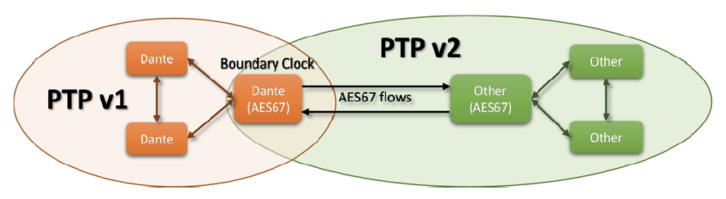
AES67 mode on a Dante device enables both IEEE 1588 Precision Time Protocol (PTP) v1 and v2. A single clock domain must be created across both PTP v1 and v2 devices:
-Standard Dante devices support PTP v1 only
-AES67-enabled Dante devices support PTP v1 and PTP v2
-Many non-Dante AES67 devices support PTP v2 only
PTP v1 and v2 are not inter-compatible. One AES67-enabled Dante device will act as the boundary clock between PTP v1 and v2, bridging the two clock domains (i.e. Dante and the other).
Dante and PTP v2 use different methods for electing the Master device. So when using the two in combination, care needs to be taken. Devices that support PTP v2 have many different priority levels available for becoming the Master device. Dante takes care of this automatically, while other PTP v2 devices may be configured manually. Select the most appropriate strategy for clock distribution, and follow these basic guidelines below.
A. An AES67-enabled Dante device is Master for both Dante and AES67.
1) Enable the device’s “Preferred Master” status
2) Disable “Preferred Master” for all Dante devices that have AES67 disabled.
3) Disable “Sync to External” for all devices.
4) Assign a PTP v2 priority level of between 128 and 255 for all non-Dante
devices.
B. A non-Dante PTP v2 device is the Master. This could be a Grandmaster Clock device, or a network switch, or another AES67 device.
1) Make sure the PTP v2 Master has a priority of between 1 and 100, and is using the “Media Profile” clock settings.
2) Disable “Preferred Master” and “Sync To External” for all Dante devices.
3) One AES67-enabled Dante device will automatically be selected as the Boundary clock, becoming the Dante Master.
C. An external word clock source is used, connected to a Dante device.
1) Enable “Sync to External” and “Preferred Master” for the Dante device which is connected to the external clock.
2) Enable “Preferred Master” for the AES67-enabled Dante device which should be the Boundary clock and the PTP v2 Master.
3) Disable “Preferred Master” and “Sync To External” for all other Dante devices.
4) Assign a PTP v2 priority level of between 128 and 255 for all non-Dante PTP v2 devices.
Of the three above solutions, A is probably the simplest to understand, though takes some configuring for the other PTP v2 devices. B is easy to achieve. C is very difficult to achieve in practice, and should be avoided if possible.
When solution B is used, make sure the Master Clock device is set to use the “Media profile” (not the “Default profile”). Profiles are a set of parameters used to define the network clock’s characteristics. In this case, the Media profile uses more frequent sync checks than the default profile, so is better suited to high performance audio systems.
The Media profile settings are described in the AES67 standard. Dante devices do not support the Default profile.
For more AES67 resources.