Why do we do what we do? This isn’t a philosophical question, it’s about installation practices. Why do we mount equipment in racks? Why do we secure cables to the rack or other places? What is the end goal of building an AV system? Perhaps the answers seem obvious, but I have seen first-hand that not everyone has the same ideas! And some of my ideas may be controversial, but they represent over 40 years of practice in real facilities.
Obviously, the goal of AV systems is to provide some functionality or end-product. But building systems is also about making them reliable, flexible, and serviceable. We want to turn over a finished design that works well and can be fixed when necessary. At one point I also wanted to build systems for the long term. But often the things I thought would last got torn out, and the ones that were supposed to be temporary stayed in use. These days I assume that change is coming–maybe even before the current design is built–so I build for reliability, not permanence
Mounting equipment into a rack or cabinet, under a desktop, in a wall box, etc. has a few primary purposes: Make it accessible for operators (the front) and technicians (the rear), protect equipment from damage, and keep devices and wiring connected. As a designer I spend a lot of time balancing these functions when laying out rack elevations or operator desks (aka consoles). Since I also do installation, I think about how the layout might help or hinder that process.
For end-users it’s about what should be within easy reach, what can be further away, and what needs to be seen and heard. This means both vertically and horizontally since arms and heights differ and some devices (like LCD displays and speakers) behave differently off-axis. The “user experience” also includes whether operators get in each other’s way, how devices and functions are identified, physical comfort, and aesthetics. It’s not possible to get everything in perfect harmony, but one can try.
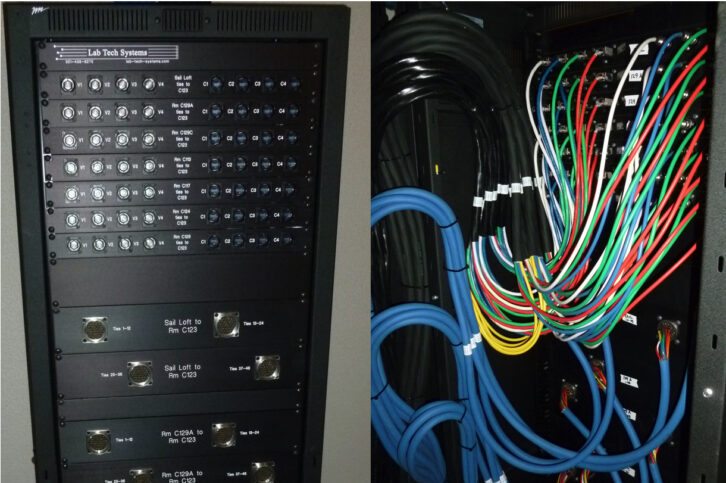
At the same time, a great layout for users may present installation problems. A common example is when something shallow, that’s only 1RU high, is mounted between two deep pieces of equipment. If you can’t hold and manipulate a connector while reaching into that 1RU space then it’s bad for installation or troubleshooting. Visualizing the back side of the rack (and checking equipment depths) can really help anyone working back there. (Fig 1)
Protecting equipment from damage certainly means keeping it off the floor–especially if there are feet nearby. But putting equipment in a rack requires attention to weight distribution so that deep or heavy gear isn’t hanging by the front panel. If necessary, support the back of deep gear on a tie bar or upside-down rack shelf.
And please, don’t put rack screws on diagonal corners! Think about it, the screws doing most of the work are the bottom two, because the weight of equipment makes it tilt backward against the rack. In many cases the top screws aren’t doing much of anything. But diagonal screws run the risk of torquing the chassis because one side can tilt outward more than the other. I’ve seen it.
Slide kits are great, as long as there’s enough room in front to slide out an extra deep server. It is also becoming problematic to use rack rails with threaded screw holes that were once typical for broadcast and AV installations. Slide kits for servers will often only work in “IT” style racks that have rails with square holes. On the plus side, many of these kits are super easy to install.
Racking gear also means considering how fans will function and allowing space for heat to dissipate around gear when necessary. Leaving “breathing room” in the layout also provides flexibility to align equipment aesthetically, and for devices to be added or shifted around in the future. I have never regretted the empty RUs I left at the beginning!
Cable dress & cable ties
After the equipment layout, the next challenge for maintaining reliability, flexibility and serviceability is installing cables. I probably picked up the term “cable dress” when learning from broadcast techs long ago, and it simply means how cables are routed and supported. Cable dress has three purposes: Provide support for connections (strain relief), keep things neatly organized, and facilitate working on a system. This last point is often overlooked in the zeal to make a rack look “professional.”
Strain relief is critically important to keep plugs in place and prevent damage where wires enter a connector. Cables that dangle unsupported from the back of gear is amateur work. And cables pulled taught are equally bad because they pull on connectors (and always end up in the way). The middle ground is allowing them to drape gently from the connector to wherever they are secured. Most cables are stiff enough to hold their position just fine. In fact, for network and fiber optic cable a gentle curve is preferable to a hard turn which can damage or misalign the internal structure.
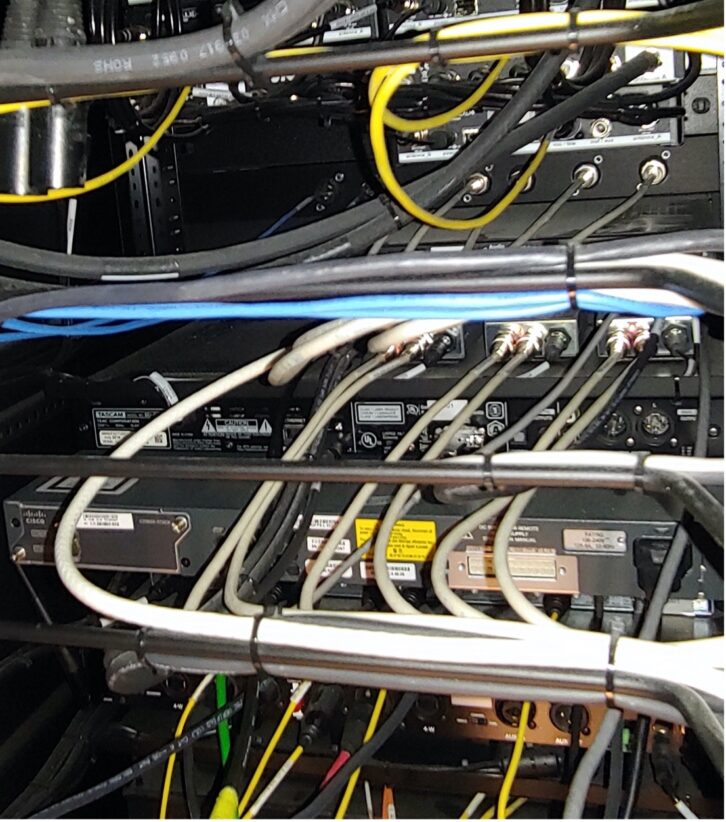
To facilitate working on a system I try to keep the area behind equipment fairly clear by bringing cables up from the sides and draping them in. This makes it easier to see and access the back of gear, and to move cables around for troubleshooting or changes. Figure 2 is exactly the opposite. In fact, I could not get my arm between the tie bars to reach the back of the equipment! Is this really a good idea? I see this approach frequently and consider it questionable. At least the installer did not put a cable tie at every single breakout. (Fig 2)
Designs and equipment change, which is one reason to provide and store excess cable. Making every cable to exact length would be time consuming and likely a fool’s errand anyway. Of course, some cables, like HDMI, have to be pre-made, which means choosing a longer length so there’s room to adjust. Access flooring and overhead trays are good places to park extra length for future changes (or when the final dress pushes excess back out of a bundle). If these options are not available, I will store in the bottom of the rack, or sometimes in vertical space between racks. This does not, however, mean a big rat’s nest at the bottom. There are ways to create a storage loop that still allows length to be adjusted.
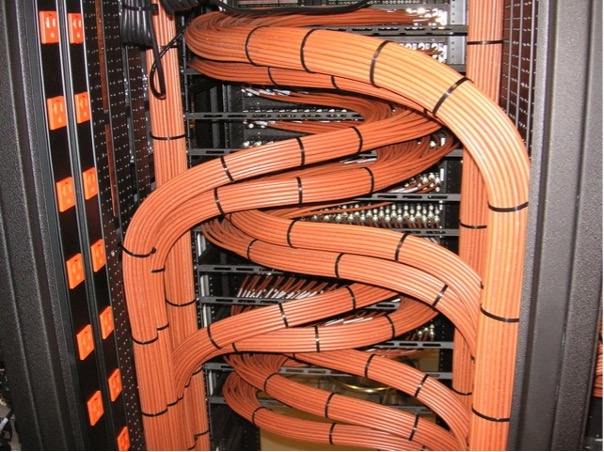
I can be pretty picky about twists, overlaps, crisscrosses, and the like in cable bundles, but the question of just how neat cables should be is controversial. A big routing switcher installation can be art in the right hands, and I do appreciate that kind of work. But what is the real goal? You get strain relief and organization, but troubleshooting or making changes can be difficult. Plus, it’s very time consuming to do. If there’s enough space, I prefer to keep things a bit looser because cable dress should be functional as well as neat. If the job does call for super-tidy dress, make sure there is extra length available someplace. (Fig 3)
Some people prefer to dress cables so they always travel the same direction away from equipment. This means cables may leave one device in the rack, run down, turn around, and go back up to another device. So some cables that could be short, and run directly between devices, end up being quite long to make the round-trip. There are times this actually improves functionality, and times when it’s mainly aesthetic.
When it comes to cable ties, I have learned that less is more. Put them where cable groups break out of a bundle, or make major transitions, and to keep long runs neat. Unless your rack is going to the moon, a few ties will work as well as a few dozen! Nor is it helpful to tie together any cables that just happen to be near each other. Using cable ties strategically will do the job while also saving time and money.
I have mixed feelings about Velcro ties. They can be clumsy to work with–always sticking to themselves and each other–and hard to manipulate in tight spaces or through holes. A high-quality nylon tie (like the Panduit PLT2I) still gets my vote. They cost a bit more but are supple and easy to work with. Just don’t cinch them super tight. And try to remove ties by cutting where the tail goes into the head, so the remaining piece can be reused!
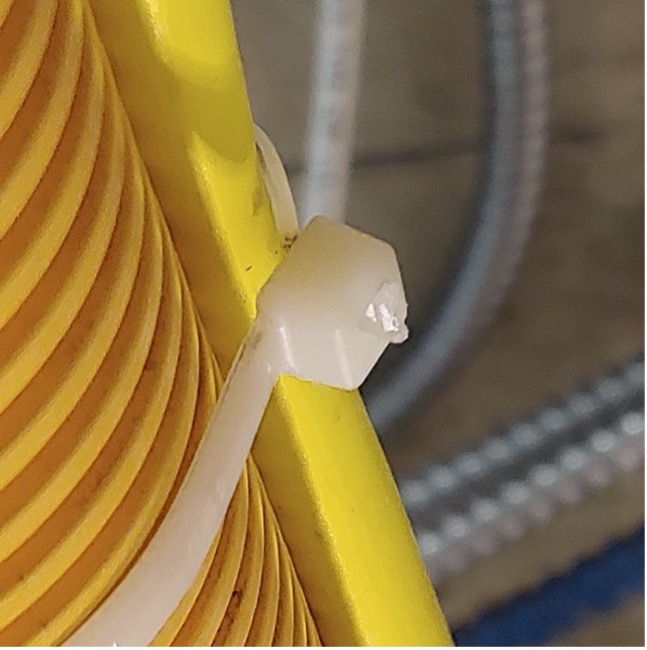
Speaking of cutting cable ties, how many of you regularly get hurt by badly trimmed ties? How many of you are the culprits who left those nasty ends? Why would anyone do this? The simple solution is flush-cutting pliers, which are cutters where the back side of the closed blades makes a smooth flat surface. If you can’t cut the ties flush, leave them long! (Fig 4)
Labeling
How to label cables is another area of controversy—though I don’t think that having labels to identify both ends is remotely controversial. The question of what goes on the label boils down to how much information is needed, how much will fit, and how it’s documented. Does the label include source and destination info, just a number, other information?
For large systems I am generally in the “numbers only” camp because cable numbers are intrinsically linked to documentation, and systems change. If we change the purpose or connection points of a cable, that can be reflected in the docs and the label will still be correct. Of course, this puts a premium on accurate documentation, kept up to date, which means someone is responsible.
The alternative, labels that state source and destination connections (with or without a unique ID number), can be quite handy, alleviating the need for docs in hand when working on a system. But this only works if the labels are accurate. Cables get moved around a lot over time, but I have never seen labels get updated and replaced. My position is that wrong labels are worse than simple labels!
Numbering schemes are another sticky point. Cable numbers don’t need to mean anything, but it’s hard to resist. Using letters to indicate the signal type on a wire (such as V for video) can be great for organizing a design and for identifying things in the field. Some schemes use cable numbers based on particular points in a patchbay or based on racks or rooms. The main downside of all these approaches is that repurposing the cable might violate the numbering the scheme. Plus, designating by signal type can be tricky, since many cables now carry multiple types of signals that were once discrete.
What really matters is that each cable has a unique identity. If V100 starts out carrying analog video, then changes to some other signal, the “V” might be wrong, but the cable is still uniquely identified at both ends. And the documentation can reflect that. Those of us with a strong sense of organization may get anxiety, but nothing terrible has actually happened.
I will admit to exceptions in my own work. If the cable is very short and clearly visible, and perhaps incidental to the design, I might forgo a numeric label (or use a descriptive label). These cables will say “no number” or “short” on the flow diagram. I might also forego labels in very obvious cases, such as the KVM cables for a computer, that tend to change, and therefore will end up unlabeled anyway.
It’s still possible to buy booklets of adhesive “wire markers,” and there was a time when it took three markers and a piece of clear heat shrink tubing (on both ends) to identify cable 100. Thankfully self-laminating labels on printer sheets, or from handheld labelers, have solved that. Sometimes laser-printed sheets can be fragile and hard to use, so I am still using a 24-pin dot matrix to print in ink (on Panduit labels that are increasingly expensive and hard to get). One last tip: If you’re going to hand-write on a self-laminating label, don’t use a Sharpie! Over time the ink spreads and becomes unreadable. Regular ball-point pen works better.
More labeling
Going back to the “user experience,” I am a strong proponent of labeling equipment and functions for operators. Too often I have seen AV systems, even fairly complex control rooms, where it’s impossible to know how anything works unless you’ve been trained or have docs on hand. Even with good labeling, systems may be hard to understand, but no labeling is just bad.
At minimum I will identify key equipment, either by the name in the design, the function, or both. On a camera monitor I might use CAM 1. But a multifunction monitor will have its design or routing name, such as MON 4, and also state what signals are on each input, ie: SDI 1: Switcher Program, HDMI: Zoom Computer. I also use labels to remind operators of specific functions, such as “CTRL-ALT-M for KVM Menu” near the user positions.
If aesthetics is important to you (and it should be) labeling need not be ugly if you make the effort to use labels that blend in, such as white-on-clear for a black rack. Use varied label sizes and fit the amount of text to the size. Ironically, sometimes it seems that my labeling is too subtle when I find that users have not noticed them! Maybe that’s a compliment?
What I try not to do, as a rule, is put labels on the equipment itself. Since equipment tends to change, it’s better to think in terms of labeling a “space” or function, rather than a specific device. In racks, labels can go beside equipment, or on blank panels. Consoles can be harder because of crowding and narrow furniture edges. Of course, sometimes labels must go directly on gear, such as audio mixers or touch panels, in order to be useful.
Admittedly, greater detail in user labeling requires a fairly sophisticated labeler. I usually use my Brother PT-9600. It’s expensive, but it can do things that are really useful. For example, on audio mixers I can create a single long label with all the text spaced perfectly to match the channel spacing. Looks nice and saves effort. Same for connector panels, which means no need for custom engraving that can’t be changed in the field.