I’m a test equipment kind of guy. I want be able to measure and generate signals objectively, based on known parameters, rather than relying on the good graces of equipment manufacturers to make their gear work correctly. This is especially true for troubleshooting and for any kind of calibration. Broadcast and production has always had test equipment because there is a need to meet established standards (sometimes by law) and a high bar for quality. So as HDMI moved from consumer connectivity to professional use the need for test gear became apparent.
I began looking at products for generating and measuring HDMI signals in 2016. Since 4K and HDMI 2.0 were starting to make headway I saw no point in buying something that could not handle those formats. Likewise, I wanted lots of options for color-space and audio. And I wanted to be able to know if HDCP is in use or not, since that is a cause of much irritation for pro users.
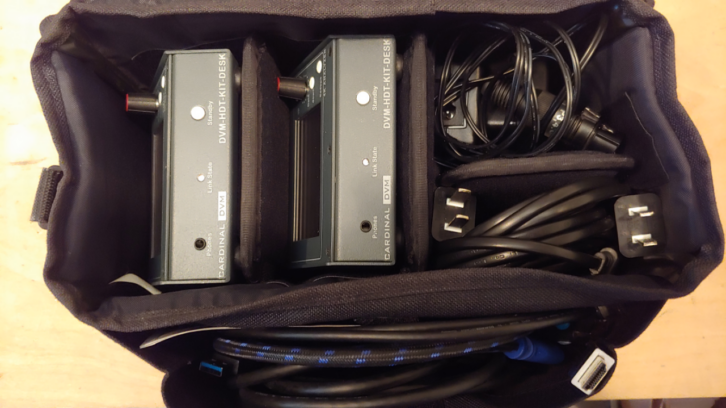
Cost was also an issue, and when I found the Cardinal HDMI test set it looked like I could get what I wanted at a reasonable price (I’m past the days of paying $5K-10K for test gear as I did with analog and SDI). The DVM-HDT-KIT, as it’s officially called, is part of the Cardinal line of AV products sold by German company Sommer Cable. In 2016 I purchased through Sommer Cable America, though it may be possible now to buy from the Sommer website.
The desktop kit consists of a separate generator and analyzer in small portable cases, both of which include a rechargeable battery. Both units have an LCD display and a few controls to move through menus for all parameters. The back has HDMI, USB, ethernet, serial and audio connections, and the front has a stereo mini jack for monitoring audio.
See also: Review: TinySA spectrum analyzer
If you have both units, I suggest connecting them together with an HDMI cable to learn your way around. Normally, the main screen of the generator shows the outgoing test signal and resolution, while the analyzer shows the incoming signal image. Click the scroll knob to enter menu mode. Moving through parameters is a combination of clicking up/down buttons for different screens, then scrolling and pressing the knob to select. The currently active parameter is outlined in yellow, and the scroll position is green. When parameters are changed on either unit it usually takes a few seconds for the HDMI to handshake again. The analyzer screen will go blank, then show the resolution of the incoming signal, then the picture. This delay is as much about the way HDMI works as about the test gear.
The generator can output a wide range of resolutions, bit depths, audio channels and sampling rates. It also has an AUTO setting in the Resolution/Timing menu that sets the output to the preferred EDID spec it receives from a sink device. The Sink EDID Info screen shows that received EDID, even if the generator is sending out something different, which is handy. Likewise, the Signal Info screen on the analyzer shows the parameters of a received signal. After parameters are changed, you may need to refresh these menus by clicking away and back.
Both units have a built-in web server which allows convenient operation from a browser, using an Ethernet connection (through a switch or direct to computer). The IP address can be set to DHCP or static from the front panel. The web GUI is not required but is easier than scrolling and clicking through menus and is needed to select video test patterns (which do change immediately).
The units can also be controlled using downloadable Windows apps: DVM-HDT-SG for generator, and DVM-HDT-SA for analyzer. The software expects a serial connection, and the units can be controlled that way if desired. Installing a USB-serial driver allows emulating serial over a USB connection. One quirk is that you’ll need a USB-A to A cable, which is slightly unusual and not typically lying around. Once the driver is installed the software can search for the device and assign the correct virtual serial port. This worked fine on my laptop with a driver that was previously installed for another purpose.
The generator and analyzer software have all the functions of the web GUI, plus the generator app allows creation of custom resolutions and timings, and the analyzer app can show detailed timing information. The analyzer app also includes a monitor function which keeps a log of changes to the incoming HDMI signal over a specified period of time. This function could be useful for tracking intermittent problems with an HDMI source, although it’s a bit cumbersome to use.
As I wanted, HDCP can be turned on and off in the generated signal, and the analyzer will show the HDCP status of a received signal. Plus, the generator is able to capture and store EDID data from connected sink devices, and both units can read and write EDID files with the connected computer. This would allow, for example, capturing an EDID from a sink device like a monitor, saving that file to the computer, then loading it into the analyzer as a User EDID. The analyzer could then present that EDID to a source device, as though it was the original monitor, and examine what the source produces.
The generator and analyzer have their own manuals that touch on most functions (including a few that might not be used in most circumstances) but experimenting with the devices is really the best way to learn. There are some funky little inconsistencies and behaviors with these units, but they perform their primary functions well. I would certainly suggest this set for people who need a reliable reference when working with HDMI and DVI interfaces.
In fact, as I was writing this review I used the analyzer to investigate an issue in a small TV studio. Some video cameras were feeding a Newtek Tricaster Mini via HDMI, but there was no video at times. After a lot of guesswork with the camera menus, I suspected an EDID problem between the cameras and Tricaster. The analyzer allowed me to see what a camera was actually producing, regardless of how vague the menus were!
In this case, we wanted the internal file recording on the camera to be 1080p30. But the HDMI output could only be 1080p60 (60fps progressive), or 1080i60 (60 fields interlaced, or 30fps). Meanwhile, the Tricaster could accept 1080p30 or 1080i60, but the on-camera viewfinders would only accept progressive. It wasn’t an EDID issue, just an unfortunate combination of incompatible devices. The end solution was to get cameras capable of both 1080p30 recording and output, allowing us to eliminate interlace altogether.